Which Products are Best for Your Job?
Choosing the correct paint for your job can be confusing. Please see our help sections below for answers to commonly asked questions.
If you are still unsure or need further advice, please call us on 01782 550733.
HELP AND ADVICE
Floor-Paint Systems
What is a floor-paint system?
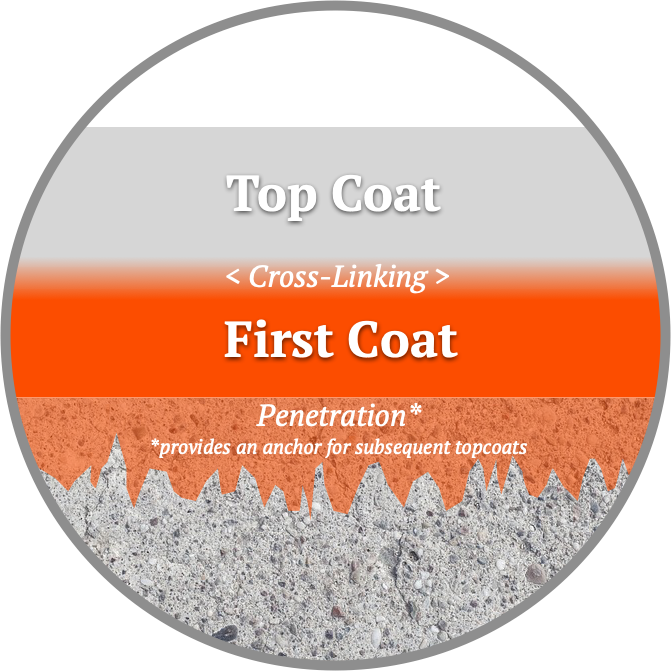
One of the raw materials used in our paints is resin. Different resins have different chemical properties. Some resins work well together and some do not. A floor-paint system gives you the option of buying a primer first-coat and a top-coat which are based on the same, or compatible, resins. Using the correct combination of products, or ‘paint system’, creates cross-linking and increased bonding between the primer and top-coat.
What floor-paint systems do you sell?
We manufacture and sell both single-pack and two-pack epoxy floor-paint systems. Both systems have a compatible primer (first-coat) and top coats specifically made on compatible resins. We have summarised the compatible products here.
Which products are compatible within the different floor-paint systems?
It is important that you choose products from the same floor-paint system. To help clear up any confusion, please see the compatibility table below. If you are still unsure, please call us on 01782 550733.
Single Pack Floor Paint
Two-Pack Floor Paint
Can I mix and match from different floor-paint systems?
No. Please do not use products from different systems on the same floor. You may run into problems such as the paint remaining tacky or the paint drying but then lifting. Only use compatible products. If you are unsure what to choose, please contact us and we are happy to help.
First Coat:
The Importance of Priming the Floor
The ‘First Coat’ is also known as the ‘Primer Coat’
Both of our flooring systems, the Single-Pack System and the Two-Pack System, have a recommended first coat. This is also sometimes referred to as a primer coat or floor sealer.
Why do I need to apply a primer sealer first coat?
We always recommend the use of a floor primer/sealer rather than (i) using none or (ii) trying to cut the primer out by applying two coats of a top coat. Quite often, people will think that a priming and sealing the floor is overkill and that a topcoat can be used straight onto the substrate. This is simply not true. Priming and sealing a floor surface is key to preparing for a long-lasting and therefore cost-effective finish.
What is a floor primer and how does it work?
A primer, whether it is a single or two-pack primer, will dry with different properties to a top coat. A floor primer is a base coat which penetrates the surface of the substrate and acts as an anchor for the top coat. Primer dries with a microscopically undulating surface and gives the floor-paint top-coat something to grip onto, creating a cross-link. The use of a primer ensures adhesion to the floor and a strong, long-lasting surface, when used in conjunction with a floor-paint top-coat.
Can I use a first coat from a different floor-paint system?
Always use the correct first coat (primer) for each system. The single-pack flooring system is made using one type of resin and the two-pack flooring system is made using a different resin. The two are not compatible and will not bond. In other words, the if you use incompatible products, the top coat will simply sit on the surface of the first-coat (primer) leaving it prone to delamination.
Why can’t I choose the colour of the floor primer?
Our floor primers are purposefully produced as a non-descript colour. They are usually either a pinky-red or khaki-grey colour; sometimes other colours. The purpose of the floor primer is purely to seal the floor and act as an anchor for the topcoat. The primer is designed to be seen whilst applying the topcoat, so that the contractor can see the areas that have and haven’t been covered. Do not be alarmed by the colour of the primer.
Can I seal my floor with PVA?
Do not use PVA on the floor prior to applying any of our products. PVA is a not compatible. Should you apply a Regal Paint product over PVA you risk delamination of the paint and non-adherence to the floor. PVA itself is only a temporary measure to seal dust. If you were to use it prior to our products, you would essentially be putting a temporary product onto the floor (the PVA) and then painting a semi-permanent coating over the top (Regal products). If you are painting a concrete floor, PVA will sit on the surface of the concrete and will act as a barrier between the concrete and the floor-system first coat. As the PVA is not durable, it will delaminate and will take the paint with it. Also, because our products are solvent based, they will react with the PVA and make a mess of your floor.
Two-Pack Epoxy Floor Paint System
Which first coat should I use to prime and seal the floor?
If you are planning to use a two-pack epoxy floor paint top-coat, please ensure that you use the two-pack epoxy floor sealer as the primer coat. This is the only compatible first coat. Any other products will not cross-link with the epoxy top coat and you will risk running into problems.
How to mix two-pack epoxy floor paint
We recommend that you mix Regal Epoxy Floor Paint using a mechanical method. Ideally you should use a mixing paddle specifically designed to attach to a drill. Make sure that you spend adequate time mixing the epoxy. Some components of the pigmented resin (in the larger or the two cans you receive) will be heavier than others and so will naturally sink to the bottom of the can. You must ensure that you really mix well. Be careful, however, not to get too over-excited and mix so vigorously that it causes bubbles in the paint.
What do I apply two-pack epoxy floor paint with?
You do not need to use a roller tray. Apply the paint by pouring directly onto the floor. Use specialist floor roller-sleeves and frames. Do not use ordinary wall-rollers from a DIY shop as they will not have solvent resistance and may disintegrate. You may also want to cut in the edges using brushes.
How does two-pack epoxy floor paint dry?
Two-pack epoxy floor paint dries or cures by way of a chemical reaction. This chemical reaction will begin when you add the activator (in the smaller can) to the pigmented resin (in the larger can).
Is two-pack epoxy floor paint temperature sensitive?
Yes, two-pack epoxy floor paint is temperature sensitive For further information, read our guide on applying epoxy resin floor paint in cold weather.
Can I split the can and use the rest later?
We get asked this question a lot. We really do not recommend splitting of the cans. The epoxy resin and activator rely on exact measurements of each in order that the curing process works properly. The quantities are measured by a machine. If you split cans and get the measurements wrong, you risk the paint not drying.
Can I mix different colours of two-pack epoxy?
No. Never mix colours. Each will have different levels of epoxy resin and mixing two different products will affect the level of activator and you risk the paint not drying.
Can I use a different activator with my epoxy resin?
No. Please always use the correct activator with the resin.
Can I paint two coats with one can of epoxy?
No. You must allow at least 24 hours before re-coating. If you apply a coat of wet paint over an existing layer of wet paint, the solvent on the first coat will not be able to evaporate and it will become trapped. Your floor will not dry properly.
How long will epoxy last in the can once mixed?
As soon as the can of activator is poured into the epoxy resin, the curing process will begin. The pot life is up to 4 hours, giving plenty of time to pour and roll the paint out onto the floor. If you leave the mixed epoxy in the can for more than this period of time, it will cure and will solidify in the can. Please ensure you use the epoxy correctly. If you are unsure about any technical aspect of this type of floor paint, please call us on 01782 550733 and we will answer any questions you may have.
Single-Pack Floor Paint System
Which single-pack first coat do I use to prime and seal the floor?
If you are going to use one of our single-pack floor paint top-coats, please use Regal Prime and Seal as the first coat to prime and seal the substrate. This is the only compatible first-coat to use with our single-pack top-coats. If you are unsure or need any help in choosing the correct products for your job, please call us on 01782 550733.
How long does it take for Regal Prime and Seal to dry?
Regal Prime and Seal is touch dry within 2-4 hours of application and dry enough to recoat after 24 hours. If the sealer still seems tacky or has shiny patches after 24 hours, please wait a little longer before applying the top-coat.
How soon after priming can I apply the top-coat?
After applying Regal Prime and Seal to your floor, please allow at least 24 hours before applying the topcoat. If you do not allow the primer coat to fully dry, and then paint over it, the solvent in the primer (which is trying to evaporate) will become trapped and the paint will remain soft.
Do I need to stir single-pack floor paint?
Just like anything else, the materials used in paint are subject to gravitational forces. This means that the heavier particles in the paint will sink to the bottom of the can. You will need to ensure that you mix the paint before use to bring the heavier particles up and into the mix. Be careful not to stir to aggressively so as to avoid creating bubbles in the paint. We recommend the use of a mechanical paint mixer which is attached to a drill.
What do I apply single-pack floor paint with?
As with all of our floor paints, a roller tray is not necessary. The best method is to pour directly onto the floor. Use specialist floor roller-sleeves and frames. Do not use ordinary wall-rollers from a DIY shop as they will not have solvent resistance and may disintegrate. You may also wish to cut in the edges with solvent-resistant brushes.
How many coats should I apply?
The answer to this question is entirely dependent on the floor that you are painting and the use that the floor is going to have. A rough and bumpy floor might need more than one coat of top-coat paint. If you need any advice on how much paint you need, please call us on 01782 550733.
How long do I wait between coats?
Please wait 24 hours between each coat.
How long before I can walk on the floor?
Wait 24 hours before walking on the floor and 48 hours before bringing vehicles or heavy goods and equipment back onto the floor.
FLOOR PREPARATION HELP AND ADVICE
Choosing between a two-pack or single pack system is perhaps the most important decision and will depend on the kind of floor you have, the use for which it is intended and the budget you have for the project. To find out more, check out out guide to painting a floor.
Even though concrete may look dry within a short period of time, it may not be dry enough to paint. The rule of thumb is to allow one month per inch depth of concrete. If your concrete is 6 inches deep, allow 6 months before painting.
There are several tests that you can do, but the two most common basic tests are the clingfilm test and the use of a moisture meter.
Clingfilm Test
- Tape a 30cm square of clingfilm to the concrete using duct tape
- Leave for 24 hours
- If condensation appears on the clingfilm there is moisture present in the concrete
- Or, if there is a dark patch on the concrete where the clingfilm has been, there is moisture present and the concrete is not dry.
Moisture Meter
- Using a moisture meter and following the instructions for the chosen apparatus, you should look for a reading of below 8%
You must always prepare the floor surface properly and adequately. A standard epoxy paint will not smooth out the roughness of a floor and will take on the form of the substrate it is applied to. If you have a particularly rough floor and are looking for a smoother finish, we therefore recommended grinding down the concrete to remove the ridges in the concrete and also cleaning the floor thoroughly prior to application of the sealer coat. The other option is to use a self-levelling epoxy. We do manufacture this product but do not sell it online – please call us with any enquiries.
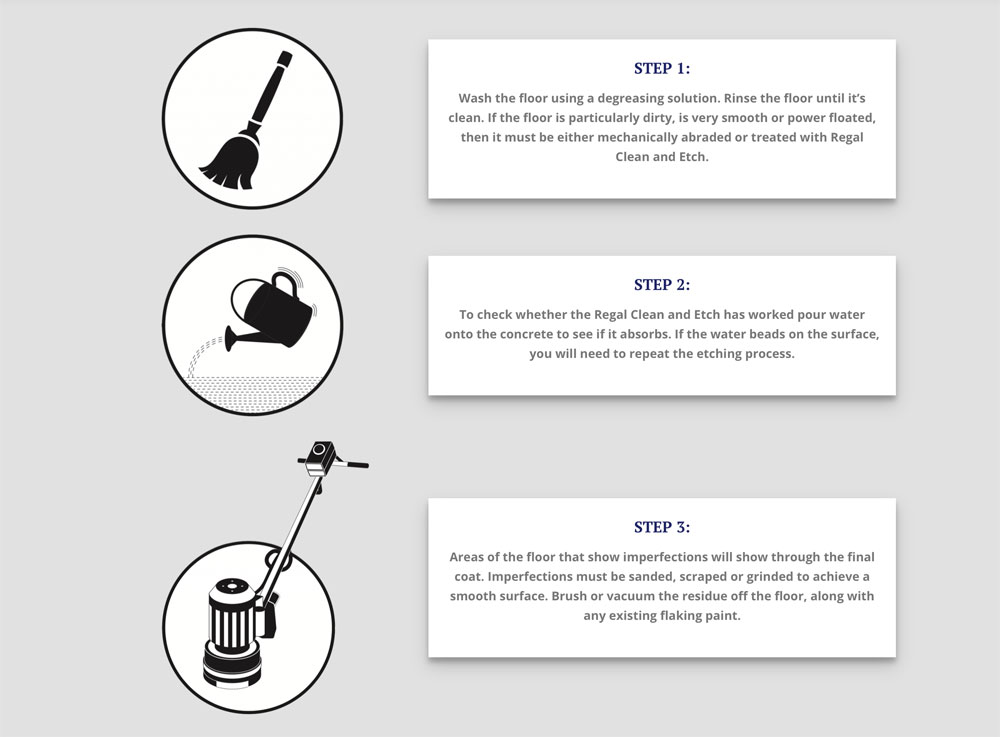
Yes you can, but as power-floated floors are like a polished surface the first coat will struggle to bond with the concrete. You will need to etch the surface of the power-floated floor. We recommend Regal Clean n Etch.
CONDITION OF FLOOR
RECOMMENDED ACTION
Newly Laid
- Allow sufficient time for the concrete to dry
- Run tests to check if the concrete is dry (see article)
Existing Paint on Floor
Please call us on 01782 550733 as specific preparation will be required
Rough Concrete
If you want a smoother finish, mechanically grind the floor or apply a thick self-levelling coating
Dirty Concrete
Clean using Regal Clean and Degrease
Smooth, Power-Floated Concrete
Use Regal Clean n Etch to open the surface of the concrete
FLOOR PAINTING ISSUES
We quality control and batch test all our products prior to decanting into cans and sending to our customers. If you are experiencing drying issues with your paint, please call us on 01782 550733 and speak to our technical team.
White marks on an epoxy floor are due to amine blush/blooming. This occurs when moisture is in contact with the coating as it is being applied or before it is properly cured. This can be due to excessive humidity, condensation and/or applying the product too thickly. If your floor has white amine blush, it can usually be removed by mopping with a 50:50 solution of citric acid and warm water. For more information, read our post on amine blush and amine bloom.
Pinholes and bubbling on an epoxy-coated floor appear as small blisters or bubbles. After the blisters pop, they leave a round crater and the pinhole can be seen in the finish of the paint. The causes of pinholes in an epoxy floor paint are usually caused by ‘outgassing’ – this is where air trapped in concrete voids reacts when fresh epoxy paint begins its curing or exothermal action. The chemical reaction creates heat. This releases moisture into the air pocket making the air within it expand. This naturally forces air to escape from the pore and towards the surface where it and becomes trapped in the coating and then either forms a blister or pops to leave a pinhole.
There are other things which may cause pinholes to appear; these include: –
- Temperature/Humidity: If it is too hot or humid, it can result in rapid drying which causes air entrapment in the coating.
- Air Movement: Air movement from fans, door or vents blowing directly on the surface may cause flash drying. This may cause bubbles which pop to leave pinholes.
- Sunlight: Direct sunlight can cause the product to become tacky before necessary air release has occurred, which results in bubbles.
- Mixing: Mixing at too high of a speed entraps air, resulting in bubbles.
- Surface Preparation: Very extreme or aggressive shot-blasting opens the pores in the concrete causing air to be trapped when the coating is applied and this may result in bubbles.
- Roller Sleeves: Not using the recommended floor roller-sleeves.
This is known as hot-tyre pick-up. Please see our blog post.
Patchy drying usually indicates a problem with the substrate that has been painted. A paint will not ordinarily dry in parts and not in others. Please see our blogs on preparing a surface for painting. If you are concerned about patchiness on your floor, please call us on 01782 550733.
COMMON MISTAKES AND HOW TO AVOID THEM
So what happens if you paint concrete which is not completely dry?
Even though you may think that the concrete is bone dry, there may still be moisture in the substrate which needs to evaporate.
Should you mistakenly paint over still-damp concrete, you may find that the paint starts to delaminate. This happens because as the moisture rises during evaporation, it becomes trapped underneath the layer of paint. The moisture has no means of escape and so it literally pushes the paint from the surface.
To avoid this, please always check the moisture level of your concrete. Please see our blog on how to do this.
A power-floated floor has a very smooth surface. It is the smoothness that prevents the floor sealer from penetrating and locking with or bonding with the surface. The floor sealer will merely sit on the surface of an unprepared power-floated floor. Then, after a topcoat floor paint is applied, no matter if you buy a cheap or expensive product, with time the sealer and topcoat will peel from the floor. This is known as delamination.
Power-floated floors are expensive and, generally, people who have spent a lot of money on an amazing floor want an equally excellent finish from the paint.
It is absolutely paramount that if you have a power-floated floor you properly prepare it by means of mechanical abrasion or chemical abrasion. The method chosen will depend on how smooth the surface is.
Abrading the floor creates a certain level of roughness on the surface of the smooth concrete. These tiny undulations give the sealer coat something to key into and therefore increases the likelihood of a bond between substrate and coating, reducing the chance of delamination.
We always recommend the use of a sealer coat on any bare concrete floor as the sealer acts as the glue between substrate and topcoat.
For more information, please see our blog on painting a power-floated floor.
There are many phrases out there but to coin one: you can’t make a silk purse out of a sow’s ear. Similarly, you can’t create a showroom-finish floor by buying some paint and just slapping it on the floor. It is imperative that you prepare the surface prior to painting. Moisture, dust, dirt and stains, poor quality concrete, air holes in the concrete, too smooth-a-finish etc can all cause issues with paint when it is applied. Similarly you can’t use paint to smooth out a floor by putting it down thicker on bumpy parts of the floor – you will create pools of paint which will surface dry and stay soft underneath as the solvent becomes trapped under the cured top skin.
If you are unsure about floor preparation, please have a look at our blogs or contact us and we are here to help.
Our floor paints are manufactured for commercial and industrial use, usually inside factories, garages etc. Our paints have not been tested for use on an external floor, however we do know that many of our customers use it for this purpose. We always try to explain that with any paints on an external floor, there is a risk that water, e.g. if it rains, may become trapped under the paint as it tries to evaporate and so may lift it. This is always a risk, however many customer are happy to try and have some great results.
Our paint is manufactured with a high opacity. This means that there is a good coverage and you don’t get the ‘see through’ effect of some paints you may have bought elsewhere. You don’t need to apply the paint thickly to give good coverage.
Thickly applied paint is likely to take a lot longer to dry. This is especially true when the weather is hot; in hot weather, thickly applied paint will cure on the surface quite quickly as the solvent evaporates and the paint cures at an accelerated rate. However, what happens to the paint below the surface? The solvent which is trying to escape has nowhere to go as it has to battle its way through the hardened surface. So the paint will look dry, may feel dry to the touch, but will most probably still be ‘soft’. If you were to dig your fingernail into it, there may be a mark left. If you were to drive on it, it may leave marks.
If you are experiencing this problem, paint a thin amount of paint onto the lid of the can (if you still have it) and check to see if it dries properly.
If you are unsure, please contact us and we are here to help.
This is a big no-no! Please always make sure that the sealer coat or first coat of paint is completely dry before overcoating. You shouldn’t really need to do a second application of topcoat unless you haven’t used a sealer. Irrespective of this, any overcoating of uncured paint may lead to problems such as solvent entrapment.
Getting epoxy paint wet without giving it at least 7 days to cure may lead to white patches appearing on the paint. This is known as amine blush or amine bloom. For more information, please see our blog post.
The use of a floor primer coat is always recommended to give you longevity of finish. The primer coat acts as a bond between the substrate and the topcoat. Sometimes people choose not to use a primer coat – this may be due to the cost involved or, for example, if you are moving premises and need to make the floor good before vacating. This is not a problem for a short-term solution. However, to make your floor coating last longer, we do recommend that a primer coat is always used over a bare surface.
The nature of epoxy is such that once the activator is mixed with the pigmented resin, the chemical curing process begins. Epoxy paint has a pot-life of approximately four hours so do not mix it until you are ready to use it. If you mix the two parts together and then leave it in the can for hours, it will ‘go off’ in the can. It will become a solid, unusable chunk of colour.
Using a roller tray may create more problems than it solves. Our paints dry quickly; paint in a roller tray is likely to become crusty in parts, as the residual paint starts to dry. This may then peel from the plastic tray and become mixed in with the paint freshly poured into the tray, creating a bitty or lumpy mix.
We recommend pouring the paint directly onto the substrate and then rolling out with a solvent-resistant sleeve.
We have application instructions available for you to look at, but we are always at the end of a phone call or email if you would prefer to ask directly.
The ingredients used to make paint vary in density. Similar to the cream rising to the top of the milk, the less dense particles in paint are likely to reside at the top of the can and the heavier particles towards the bottom. The paint will therefore need a good mix before using. If you do not mix paint properly prior to using, you might find some of the heavier pigments may remain at the base of the can.
We recommend the use of a mechanical paint mixer which is attached to a drill.
If you haven’t mixed the paint prior to application, you may see streaks of pigment and/or may have curing problems.
If you have done this, you are certainly not the first person to make this error. Please always read the technical information which is alongside each of our products online. If you have never used industrial floor paints, whether single pack or two pack epoxy, please contact us as we have a wealth of knowledge to share with you and to help you get the best for your floor from our products.
If you forget to mix the two parts of the epoxy system together, and simply paint the pigmented resin onto the floor, it is not good news. Without the activator, the paint is incomplete – the chemical reaction which starts the curing process cannot happen and the pigmented resin will never dry. It will need to be scraped up off the floor.
Two-pack epoxy is paint is like any other epoxy product, such as glues, which require two parts to be mixed together in order that they work as a whole.
What Makes a Good Floor Paint?
Like any manufactured coating, the end product is only as good as the quality, quantities and combination of the raw materials that are used.
As an established business, we have excellent trading relationships with our worldwide suppliers and we source and buy only high-quality resins, pigments and solvents. We do not pack our products with fillers.
Over the last few years, the floor paint market has been flooded with cheaper products. We cannot comment on the quality of these paints, but if you want a coating which has been manufactured with care, using superior materials here in the UK, look no further than us.
FAQ High Build Phosphate Quick Dry Primer
Over the years there has been a lot of misinformation provided concerning red oxide, primarily due to its widespread use in red oxide primers where its principal application is to camouflage rust creeping through from the steel underneath. Red oxide is actually the common name for iron III oxide (Fe203) which in colour and chemically is very similar to the hydrated iron oxide (rust) which hides any early signs of rust. Red iron oxide when purified and sold as a pigment for use in paint and ceramics has the advantage of being stable having already oxidised and so resistant to further oxidation and heat changes at most temperature found in common applications. It is also hard and very resistant to mechanical damage. All of these characteristics have led to its widespread use in primer paints or direct to metal paints for iron and steel for many decades. However, unless combined with an active pigment, usually a phosphate to protect the steel there is little actual protection provided by the red iron oxide other than as barrier and here it is often confused with a more effective form of barrier coating based in micaceous iron oxide which is another form entirely and uses its lamellar plate like structure to provide some physical barrier to the penetration of water and oxygen, both of these are needed for corrosion to take place.
Corrosion is an electrochemical process, very much like a battery in which the iron in steel is oxidised by losing electrons to become positively charged iron ions:
Fe » Fe2+ + 2e-
The electrons produced by this reaction combine with hydrogen ions in the water as well as with dissolved oxygen to produce water:
The formation of rust requires iron, water and oxygen. Although it’s a complex process, the chemical equation is simply:
4Fe + 3O2 + 6H2O → 4Fe(OH)3.
The First Step: Oxidation of Solid Iron
It’s common knowledge that rust occurs when you leave water on a metal implement or you leave it exposed to moist air. That’s because the first step in the rusting process involves the dissolution of solid iron into solution. The formula for this is:
Fe(s) → Fe2+(aq) + 2e-
The electrons produced by this reaction combine with hydrogen ions in the water as well as with dissolved oxygen to produce water:
4e- + 4H+(aq) + O2(aq) → 2H2O(l)
The consumption of hydrogen ions that occurs as iron dissolves leaves a preponderance of hydroxide (OH-) ions in the water. The iron(II) ions react with them to form green rust:
Fe2+(aq) + 2OH–(aq) → Fe(OH)2(s)
BUT that isn’t the end of the story. The iron(II) ions also combine with hydrogen and oxygen in the water to produce iron(III) ions:
4Fe2+(aq) + 4H+(aq) + O2(aq) → 4Fe3+(aq) + 2H2O(l)
These iron ions are the source of the reddish deposit that gradually eats holes in all corroding steel and iron from car bodywork to metal roofing to farm ironwork. They combine with the extra hydroxide ions to form iron(III) hydroxide:
Fe3+(aq) + 3OH–(aq) → Fe(OH)3
This compound dehydrates to become Fe2O3.H2O, which is the chemical formula for rust. Note how similar it is t the chemical formula for Red iron oxide pigment Fe2O3 and this is why red iron oxide paints help to camouflage but do not prevent corrosion when used as red iron oxide primers or paints – for that you need a pigment that actively prevents corrosion such as Nanoguard ACP
Anti corrosive pigments? What are they? Here we try to give a simple explanation.
Over the years, many products have been used (to a greater or lesser degree of success) in the prevention of corrosion, often together with red oxide to produce a red oxide metal primer.
The purpose of primer paints is to act as preparation, forming part of the protective coating for the underlying metal and inhibiting rust formation.
In the past, toxic pigments such as red lead, and carcinogenic pigments such as chromates, have been used. However, due to health concerns they were replaced largely by zinc phosphate. In turn, this old technology was found to be very bad for the environment leading to its replacement by zinc-free systems, replacing the harmful heavy metal zinc with the friendly metal calcium. Since calcium phosphates are widely found in our bodies there are no harmful effects on either human health or the environment from this technology and so modern formulations tend to be zinc-free.
Early versions of zinc-free anti-corrosives first appeared in the late 1980’s when BP became concerned about the leaching of heavy metals and things like zinc-based paints into the sea from their oil rigs. This earlier technology, based on calcium ion exchanged silica, has gradually been superseded by a variety of calcium-phosphate based products such as Nanoguard ACP DCP and Nanoguard ACP2 (used to replace carcinogenic chromates).
Formulation of metal protection products, including direct-to-metal products such as the traditional hammer-finish paints and epoxy coatings, now widely use calcium-phosphate to protect metalwork. With a pedigree developed for the harsh environment of the North Sea oil fields these zinc-free phosphates continue to provide longevity to steel structures around the world without damaging the environment or our health.
Here at Industrial Protective Paints Ltd, all of our products that require anticorrosive properties, for example Regal Anticorrosive Primers and Regal Skip and Container Paint, are manufactured using calcium-phosphate technology.
FAQ Skip and Container Paint
If you are painting bare metal, we would always recommend the use of an undercoat or primer coat first. Regal Skip and Container Paint is made with extra anticorrosive materials, more than regular metal enamel so does give more corrosion protection. This is designed for quickly overspraying existing skip paint or container paint as we know our customers need a speedy turnaround. Our primer paint is designed for bare metal or spot priming, creating an anchor between the metal and the metal paint. So yes, ideally use our red oxide primer or grey oxide primer to undercoat bare metal. Always prepare the surface thoroughly prior to painting.
Regal Skip and Container Paint is manufactured with the addition of calcium phosphate. This gives added protection against metal corrosion. Regal Quick Drying Gloss Enamel doesn’t contain calcium phosphate and is a topcoat enamel.
The Skip and Container Paint can be used alone as an overspray to tidy up painted skips and containers. If used in combination with Regal Anticorrosive Phosphate Primer, there will be an additional level of protection.
Always try to remove rust prior to painting and spot prime if needed.
We make our Skip and Container Paint on a xylene thinner. If you do need to thin back the paint, you can use a standard cellulose thinner. Please do not under any circumstance use a white spirit. Cellulose thinner is a standard thinner for paint and can be found in most DIY stores such as B&Q. We do sell standard cellulose thinner in both 5 litre and 25 litre options – if you would like to add some to your order, please call us on 01782 550733.
Skip Paint is manufactured with the customer in mind. Understanding our market is key and it was in fact Regal Paint who spotted the gap for a product called Skip and Container Paint. In the days BI (Before Internet) we would advertise to skip companies through the paper copy of Industrial Exchange and Mart, selling red oxide primer and onecoat enamel. Realising that speed is of the essence, we started to make a specific product combining the anticorrosive properties of primer with the durability of enamel. Use our skip paint to freshen up the inside or outside of regular skips, enclosed bins, roll on roll off skip containers and to also paint shipping containers. Durable, quick-drying, full of anticorrosive properties, and easy to apply. Regal Skip and Container Paint is the original and the best.
Floor Paint FAQs
Whilst newly laid concrete slab can look dry and it can also feel dry to touch, it may actually still contain water. We would recommend that you wait to paint new concrete until it has dried for 1 month per 1-inch depth of the concrete slab. So, for a newly laid concrete block of 6 inches in depth, we would recommend waiting for at least 6 months until painting.
